| Online Gaming > SubNautica |
Advertisement |
|

|
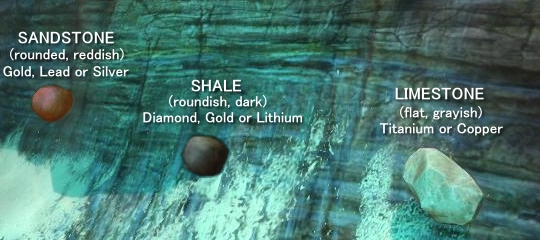
Start locating
the rock outcroppings to gather their resource. The flat gray stones
(Limestone) have either Titanium or Copper and are plentiful in the
'Shallows'. The brownish round stones
(Sandstone) give Gold, Silver or Lead that are often in shallow caves,
in the Creepvine area
along the walls and red grass pillars. Areas out
beyond the 'Shallows' can contain a dark rock
(Shale) and found in the same areas of other stone outcrops.
|
 |
|
Craft the
components in the priority list until you are able to make the Habitat
Builder tool. From there, you can construct a Simple Base #1.
List below
are some great examples including Simple Bases, Outposts and Depots.
Each list the advantages and materials needed. Note that Foundation
Pieces are not needed for base construction.
Once you have
your first base, you can start on the other game objectives. To get the
Repair Tool, you will need to explore some caves for the Cave Sulpher,
which are in the scary Crash Fish bulbs in the caves. To do that,
you'll need to craft the Flashlight. Avoid the caves at night without a
light source
(Flashlight/Sea Glide). Not only will you miss important resources, but
also risk getting lost and drowning.
|
|
|
Helpful
Tips & Tricks
|
»Re-Use;
If
at all possible, use depleted batteries to craft new
tools. Be sure that full battries are not in your inventory.
|
»How
to
avoid the exploding Crash Fish;
Swim back from them as they
approach, then quickly swim forward to where it came from. Collect the
Sulpher from the plant. They are fast,
but are unable to turn around quickly. Alternatively, slashing at them
with a
knife as they leave the nest will destroy them before they can explode.
|
|
HABITAT BASES
|
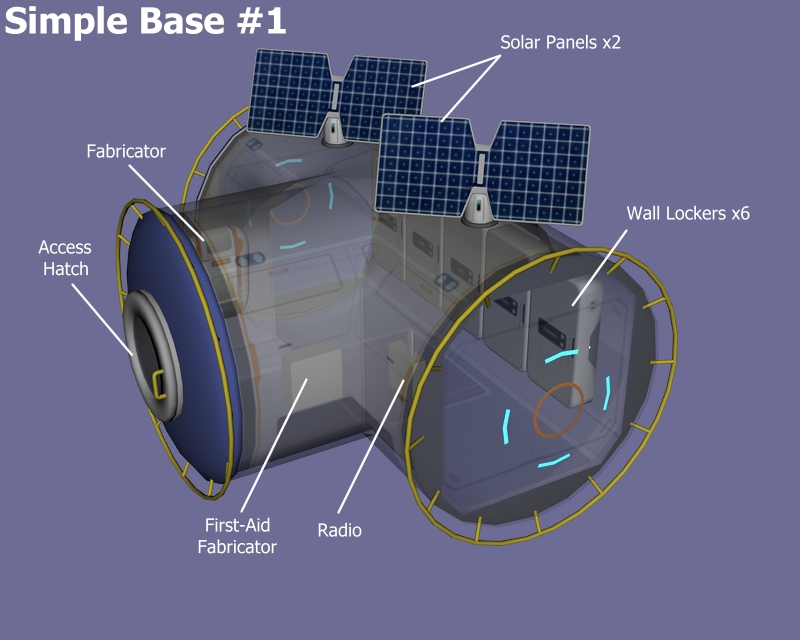
Simple
Base #1
3-Way Tub Base. For your initial base, place this close to the escape
pod so it will be easier to find, but anywhere in the
Shallows is fine.
| Construct: |
Inventory |
Gear: |
3-Way Tube
Entry Hatch
Solar Panel x2
Wall Locker x6
Fabricator
Medical Kit Fab
Radio
Add a Beacon if too
far away from pod
|
|


|
A Spot
Light or Flood Lights could help find your base. Although this simple
base can be
used anywhere as a depot, there are better options (see Outposts below).
|
 |
|
|
Helpful Tip:
Naming your lockers will save you a lot of time and
frustration. Keeping your stored inventory in an organized fashion will
make production a lot easier and help to prevent wasted trips for a
single item you already have on hand.
Designate a
locker near your Fabricator for Titanium, since that resource gets used
the most. Avoid using names like 'miscellaneous', 'stuff' or unnamed
locker.
|
Locker Name
Suggestions
|
TITANIUM
|
Typically will need more than one. |
|
FINE METAL |
Gold/Silver/Lithium |
| COPPER |
Second most used ore in the game |
|
HVY METALS |
Lead/Magnetite |
| FOOD |
Fish/Water/Nutrient Blocks/Plants |
|
ORGANICS |
Plants/Teeth/Gells |
| FABRICS |
Rubber/Synthetics |
|
GEAR |
Tools/Batteries/
Beacons/ |
| SILICA |
Quartz/Glass/Salt |
|
COMPONENTS |
Computer Chips, Wire Kits, Etc. |
| MISSION |
Next project items to help keep focus |
|
GEMS |
Diamonds/Rubies |
Eventually some lockers can be divided, like SILVER, GOLD and
BATTERIES.
|
Past this
point will contain information not known in early game
Proceed only after discovering how to make
additional Habitat modules
|
|
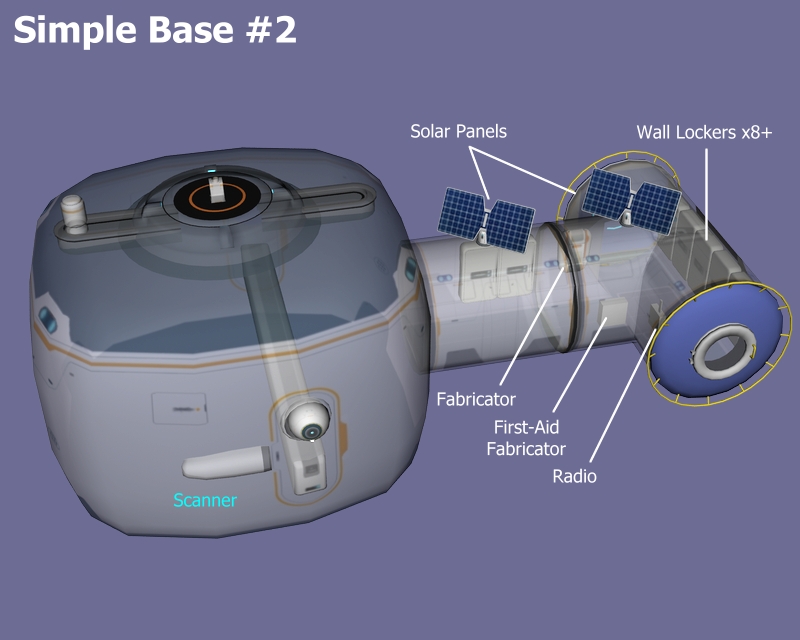 |
Simple
Base #2
The second Base is a combination of Base #1 and the Outpost.
You will need to locate the Scanner Room fragments before you can build
this base. All can be found less then a kilometer west of the Shallows.
| Construct: |
Inventory |
Gear: |
(Simple Base #1)
3-Way Tube
Entry Hatch
Solar Panel x2
Wall Locker x8
Fabricator
Medical Kit Fab
Radio |
|
|
| Scanner Room |
|
|
|
|
| Powering
Your Bases |
|
Scanner Room
Tips: |
For
small bases and outposts, a few Solar Panels are great as long as
you're base is above 100 meters. However, with deeper locations you
will
need a different power supply. The Bio-reactor is labor intensive and
swallows up important consumables. The Nuclear Reactor requires a rare
resource, but will last for a long while unattended.
By far, the most useful power source is the Thermal Reactor. It
requires no resources and will last indefinitely. The catch is that you
need your base near a heat source or lava vent. There are many such
locations, including in the Swallows. Each reactor unit produces 250
power and can be stacked in series. You will need the Power
Transmitters to relay the generated power from the unit to your base
and may require several connected together. |
|
There
are two remote controlled cameras usable from in the Scanner Room via
the video monitor and have built-in beacons. Beware that Stalkers love
to run off with these.
A menu on the viewer panel lists detected resources and points of
interest within range and/or discovered. Only one type can be selected
at a time.
Range Modules can be doubled up for an additional 50 meter range (up to
500 meters). Speed Modules find select resources quicker.
The Hud Chip allows you to pinpoint selected resources outside the
Scanner Room. Only one is required and will connect to any powered
Scanner Room in range.  
|
|
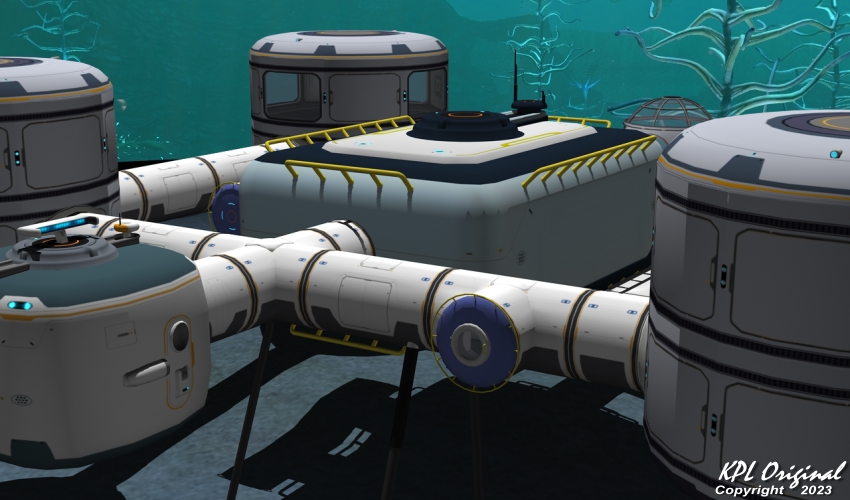
Simple
Base #3
Dubbed 'Starship' this is the base needed once you have the Sea Moth.
Construction should be done in two phases.
Keep in mind
your bases' structural integrity as you add pieces to your base. Add
Reinforced Panels to at least two of the outward 3-way Tubes, which
will add to hull integrity. Attach these before adding Wall
Lockers on the inside, as anything attached to the walls may prevent
you from adding the reinforcement panels. Moon Pool
entrance is on the bottom and you launch toward the end without the
rotating radar. Be sure to allow enough space to dock your Seamoth. In
extended depths, a foundation can be placed well below the Moonpool to
allow you to dock a Prawn Suit.
| Construct: Phase 1 |
Inventory |
Gear: |
Moonpool
Scanner Room
Solar Panel x3
3-Way Tubes x2
Reinforcement x2 |
|
|
| Construct:
Phase 2 |
|
|
3-Way Tubes x2
Speed Mod
Range Mod
Fabricator
Wall Locker x6+
First-aid Fabicator
Radio |
|
|
| (Optional) |
|
|
Multipurpose Room
Windows x2
(tube ends)
|
|
|
|

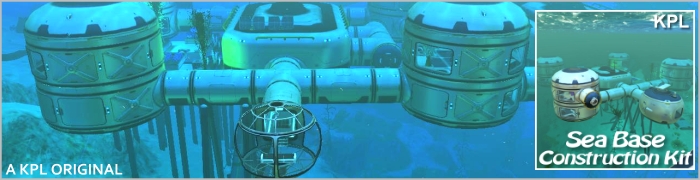
Rendered
in Daz Studio using the Sea Base Construction Kit

Actual
game screenshot
|
|
|
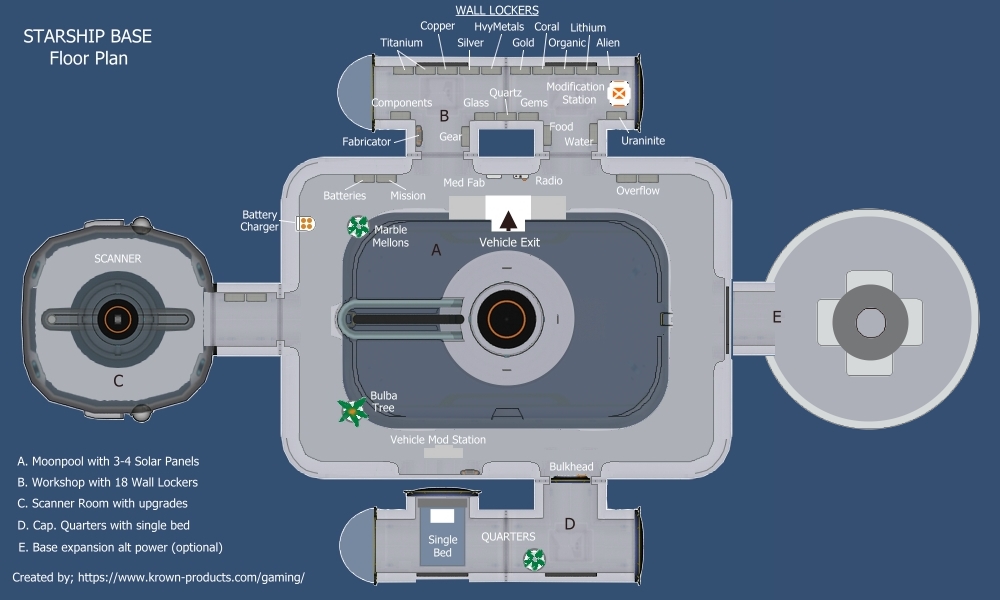
The 'Starship'
base is my go to for all my bases. The layout is designed for optimal
efficiency using the least amount of materials having everything needed
in a compact design.
It's important to build this type of base in steps to facilitate it's
unique features. When a suitable base location is found, begin with
orienting the Moonpool for best vehicle egress. This also sets the
alignment of all other pieces added to the base. Vehicles exit to the
opposite side of the rotating radar on the top.
The depth of the base will determine which type power you can use.
Above 100 meters, simple solar panels can be used effectively. Placed
near
Thermal Vents will allow use of unlimited and resource friendly Thermal
Reactors.
|
A) Moonpool; Add
Radio, Med Kit Fabricator, Vehicle Mod Station, Planter Pots with
Marble melons and a Bulba Tree. Install at
least 3 Solar Panels to the roof for power.
B) Workshop; After connecting the 'T' tubes, add at
least 2
Reinforcement panels. Do this before adding lockers. Build a Fabricator
and Modification station. Add up to 18 Wall Lockers all around the wall
perimeter.
C) Scanner; Attach a Scanner Room with preferred upgrade
modules.
D) Quarters; Add 2 'T' tubes noting that the tube
for the bed does not
attach to the Moonpool and is opposite of the Vehicle Mod Station.
Orient the bed as shown to allow exit/ entry after sleeping.
E) Optional; Expansion if Solar Panels are not
possible, a
Multi-Purpose Room can be added for a Reactor. Another use could be for
an Alien Containment. |
|
|
 |

Interested in
creating your
own rendered
3D artwork?
Click here to get
Daz Studio Free
|
| OUTPOSTS and DEPOTS |
|
|
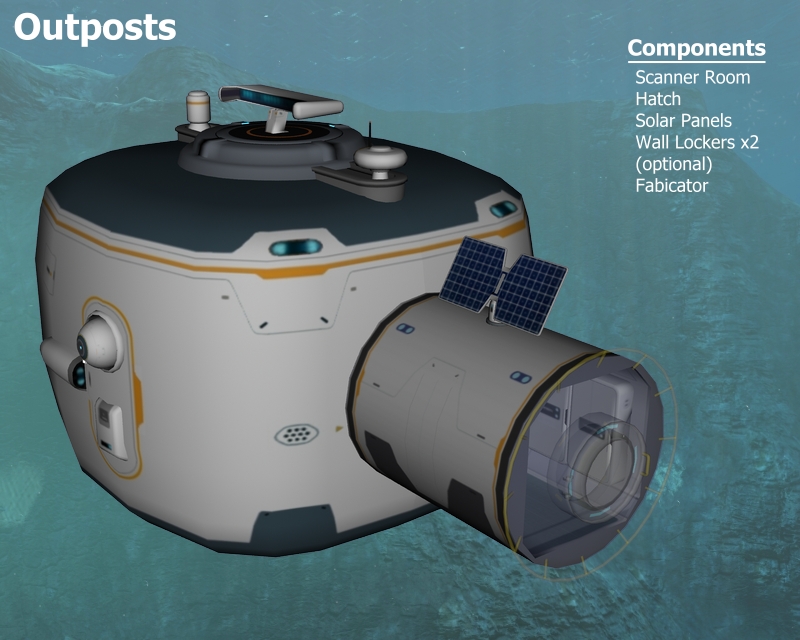
|
Outposts
These are are for areas you want to search. Upgrade the Scanner Room
with Speed and Range modules you can make from the on-board Module
Fabricator  . .
| Construct: |
Inventory: |
Gear: |
Scanner Room
Entry Hatch
Solar Panel
Wall Locker x2
Fabricator
Speed Mod
Range Mod |
|
|
A Beacon is not
critical as the Scanner Room includes two remote Cameras that will be
visible in the HUD.
|
|
 |
 |
|
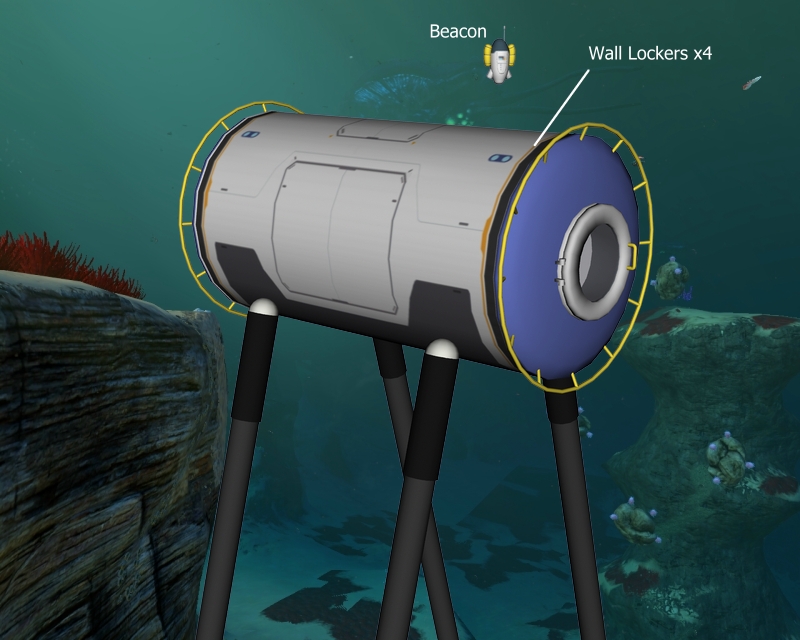
Depots
These are just a single Tube with a Hatch and 4 lockers inside for
temporarily storing materials when far away from your Pod. Because the
Depot is unpowered, there is no air unless you add a Solor Panel. Be
sure to deploy a Beacon so you can find the Depot later. The Depot can
be de-constructed when no longer needed.
HINT: It can be
helpful to name the beacon based on the biome and compass heading, such
as 'Shallows-South'. You can also add the depth if desired, 'Dunes-West
120m'.
|
|
More...
For late stages
of the game, it may be advantageous to utilize the Connected Gates Guide
for base
building (spoilers).
|
|
|
|
Construction
Appendix
|
 |
Advertisement
Skillfully
crafted sci-fi 3D models available at the
MeshWorks3d
Store
|
© Copyright Krown
Products Ltd. 2008-2025
All rights reserved |